 |
 |
|
CATALOG
• Books
• Brushes
• Dyes
• Resists
• Supplies
• Color Charts
• Accessories
• Moyer Design Fabric Stretching System
CLASSES
• Retreats
• Workshops
• Private Classes
• GALLERY
• About Susan Moyer
• Contact Us
• STUDIO SAFETY,
World Batik Conference 2005 and The Surface Design Conference KANSAS CITY 2007


01 Studio exterior

02 Studio interior
03 Studio vents
04 Outside fan
05 Interior vent T
06 Interior vent T2
07 Vent Right Angle with hood
08 Hood with screen
09 Hood with filter
10-Studio- Struts
11-Pully
12- Vent System
13- Judy Bonney, assistant
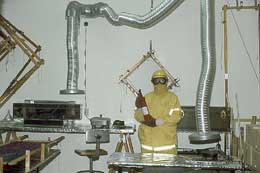
14- Hoods over steamer and wax pot
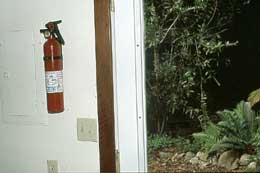
15-Extinguisher by the door

16- We didn't have a fire to put out so we asked Judy to put the cat out instead.
17- Lighting/plus skylights
18- Worktable
19- Worktable-detail
20- Wall Racks
21-Silk Racks
22-Wine Box Storage
23-Ladder Hooks
24-Sink
25-Sink detail

26-Lancing Street, Mendocino
Studio Ventilation
& Design Ideas
As presented at the
World Batik Conference BOSTON 2005
and The Surface Design Conference KANSAS CITY 2007
by Susan Louise Moyer
This information, gleaned from many years as a batik artist and silk painter, is intended to suggest some options artists need to consider when creating studio space for working with various dyes, chemicals and melted wax. The information will include recommendations on how to construct inexpensive ventilation, lighting options, basic safety precautions, and storage for studio supplies such as dyes, fibers and flammable material.
To prevent exposure to toxic or hazardous chemicals being used and stored, make a list of the products that you are working with such as dyes, dye assisting chemicals, mordants, discharge chemicals, wax, natural and synthetic fibers. Then research the items on your list so you can identify the hazardous materials and learn how to handle and store these products.
To make your research an easy process, I highly recommend that you invest in, Monona Rossol’s book, The Artist’s Complete Health and Safety Guide published by Allworth Press. Monona’s book is easy to use and will answer most of , if not all of, the questions you may have. She also provides a list of commercial as well as nonprofit organizations that educate and answer questions concerning their products. ACTS, the non-profit Arts, Crafts and Theater Safety organization has a list of data sheets available for a nominal cost. Among the list are: All about Wax, Dyes and Pigments, Gloves, Identifying Dyes and Pigments, Quilting Safety, Solvents, Understanding the Material Safety Data Sheets (MSDS).
Start your research by rereading the labels on the products you are using. When purchasing products you can request the MSDS from the manufactures. This information sheet details, precautions, potential health hazards and the chemicals involved. Once you know the chemical make up of a product you can also utilize the Internet to research detailed information on these chemicals.
Dyes and Pigments
Even though you can request a safely data sheet from the dye manufactures, manufactures often rename colors to make them more appealing and color descriptive to the consumer. To protect the recipe of their products, others systematically withhold the exact composition of their dyes and pigments and other products. The dilemma is, that once a manufacture spends the time and expense to develop a palette of colors and to manufacture and market their products, it can be either legally kept as a trade secret exemption or generally not a wise business move to share this information with their competitors. Unfortunately this makes it next to impossible for artist’s to easily identify all the colorants and chemicals they are working with.
Since most classes of dye include some colors that are considered carcinogenic or potentially toxic and we know that many colorants are not easy to identify and that new colors entering the market may not have been tested, artists need to take on the responsibility to protect themselves. Therefore, take the time to set up your studio and adapt working habits to prevent the dye and other chemicals that you work with from entering your body, via skin contact, inhalation and ingestion. This may sound daunting but as you follow along with me you will realize that the information you need is easily accessible because it has already been researched and compiled by members of the Surface Design Association and others.
Those artists who mix dye powders into liquid and make dye baths from dye powders are the most at risk. In it’s powder state, dye can easily become airborne. During the sixties, when I was using powder dyes to make a dye bath, I quickly became aware of how easily it becomes airborne and how it can travel. Color showed up wherever it landed, in my nose, on my silk, and on other dangerous or inconvenient places. To eliminate this problem, I set up a place to mix powdered dye away from a draft and in an isolated area that could easily be wiped down with a wet cloth. I covered the working area with wet paper towels, which kept the loose dye from floating off the surface. The stained towels could be easily trashed. To protect my health, I wore a disposable dust/mist respirator, rubber gloves and covered my hair. Once I was finished mixing the dye, I changed my work clothes including my shoes and wiped up the floor with a damp mop. This common sense approach for mixing powdered dye is now considered standard procedure for fiber arts. But be aware that disposable dust/mist respirators will not filter gases and will not protect you from the fumes emitted from a dye bath.
Now that we are in the 21st century and more aware of the safety issues regarding the chemicals and process we are using, there are some additional recommendations. If you work with dye powder on a regular basis you need to further prevent inhalation and contamination by setting up the simple home made mixing box illustrated on Pro Chem's web site (www.prochemical.com) or by making a Plexiglass box pictured in Karren Brito’s Shoptalk article, Dressing for Dying, featured in the Winter 2006 Surface Design News Letter. Remember to set up the work station in an area away from drafts, air intake ducts and turn off ventilation systems.
When exposing yourself to dye baths and other potentially toxic colorants and processes wear a MSHA/NIOSH approved respirator. Equip the respirator with the specific cartridge recommended for the gases you will be exposed to. For example, organic vapor cartridge for alcohol and organic solvent, acid gas cartridge for chlorine, sulfur dioxide, particulates, sulfuric acid and acetic acid, and an ammonia gas cartridge for sulfuric acid, lye, caustic soda, sodium hydroxide. If you are working with corrosive chemicals such as acetic acid and lye wear a full-face respirator to protective your eyes and face. For detailed information on how to select a respirator and the appropriate cartridges, may I again refer you to Karren Brito’s article, Dressing for Dying, featured in the Winter 2006 issue of the SDA Newsletter.
Another consideration when working with chemicals is the type of protective gloves or barrier creams you are wearing. Different chemicals require different gloves or barrier creams. When I am working with dye powders and acid dyes I use latex gloves, heavy duty long rubber gloves (latex) when working with dye baths, Nitrile gloves when working with organic solvents such as naphtha and mineral spirits and abrasives. For detailed information on the differences between corrosive chemicals and chemicals with possible long term effects and the proper gloves to use, refer to Joy Butrup's DVD titled, Health and Safety: Working with Textile Dyes and Chemicals.
Another consideration is that some solvents like acetone can penetrate certain gloves in minutes. Find a glove supplier who provides information on which gloves to use and how long each type of glove material will hold up to a specific chemical.
To order and receive technical support concerning respirators and gloves go to Labsafety Supply, www.labsafety.com or IVL Technical Sales, Inc. , www.ivltech.com.
The quantities of dyes and auxiliary chemicals used by home dyers rarely exceed limits set for disposal in municipal or even septic systems. The amount of rinse water used for a normal dye bath is sufficient to dilute your dye bath for disposal purposes. But, if you are disposing of concentrated amounts of highly acidic or alkaline wastewater on a regular basis it can upset the balance of a septic system and may not be acceptable for municipal waste management systems. We have a well and a septic system but as a silk painter when I clean up and wash my brushes and palette I am disposing of a small amount of dye. So disposal is not a concern for me at this time.
If you have questions about disposal of dyes, mordants and other chemicals used in your processes, contact your local board of health for guidelines on the health, safety and environmental protection laws specific to your area.
Storing Dye
Dyes come in powder and liquid form. To prevent the powder from absorbing moisture, store your powdered dyes in airtight containers in a dry place. To prevent liquid dyes from losing color intensity, store out of the direct sunlight and preferable in a dark cool place.
Natural & Synthetic Fibers
Constant exposure to fibers, both natural and synthetic can be problematic. Natural fibers and animal fibers can carry mold and mildue. Chemical treatments found on any textile can also cause allergies or sensitivities. In the sixties and seventies when polyester was in and silk was out, I was able to find and purchase beautiful jacquard silk at a nominal cost. The silk was being stored in damp cold and in the summer hot and humid warehouses in the New York garment district and the jobbers were practically given it away. I soon found that silk, especially when it has been stored in a warehouse can carry mold. As I repeatedly worked with the silks I became over sensitive to this mold and had to stop using silk for awhile. Who would have guessed? Another problem cropped up when I was overseeing production of my products in an old factory in the garment district. I found that my skin became overly sensitive to the sizing on heavy cotton and the fibers in the air were making me wheeze.
I had never experienced being allergic to anything except a fussy caterpillar I played with as a child. I now realize, that constant exposure to chemical treatments, molds and mildue found on fibers can create sensitivities and allergic reactions. As a fiber artist you may be exposing yourself to a variety of possible irritants. Therefore, purchase your fibers and textiles from reliable suppliers who will provide information about the origin of the materials, dyes and treatments that have been applied. If you are working with raw, unclean materials, get advice on the best methods for cleaning and disinfecting fibers. Do not use mildue or musty material and to avoid growth of microorganisms store fibers in a clean, dry place.
Melted Wax
Wax decomposition accelerates as the temperature increases. Heat wax only warm enough to melt and penetrate the fibers you plan to resist. If there is a hot wax odor, toxic gases such as acrolein and formaldehyde are being released. The process of ironing out wax is also hazardous. If a haze of fumes are being produced, the iron is too hot. But since, there is not a respirator cartridge that has been approved for acrolein, the best way to protect yourself is by using local exhaust ventilation.
Ventilation
For artists who are working with dye baths, wax, airbrush and screen printing use proper ventilation such as a canopy hood, movable canopy hood or slot hood system.
If you occasionally work with melted wax and other products and processes that need tobe ventilated you might consider installing a temporary exhaust system by putting an inexpensive portable fan in a window. This can provide adequate fresh air and draft to draw the fumes away from you and your work area. To provide proper ventilation the exhaust fan should have side panels that expand to fit the window snugly. Place the fan in the window so it exhausts or pulls air from the room to the outside. If the fan is not completely enclosed in the window, it will pull the exhausted fumes back into the room. You will find that wax will collect on a window screen so temporarily lift or remove the screen before installing or using the fan. When you are working with melted wax, place the wax pot and worktable in front of the window and sit facing the fan so the fumes are drawn away from you. Open a door or window on the opposite side of the room so that the cross ventilation is sufficient to keep the fresh air flowing. Be careful not to block or obstruct the fresh air intake. Do not setup your work area near a pilot light or anything else that could ignite fumes and do not smoke since any open flame could ignite fumes.
For the professional batik artist and other artists working with flammable products that need to be ventilated, the studio work space should be equipped with a non-explosive high power ventilation fan. The fan should be installed in either a window, ceiling or preferably an outside wall exhausting the wax and fumes to the outside, not into another indoor space such as an attic. The placement of the fan, whether it is in the window, wall or the ceiling, should be in the front of the workspace.
Fans are designed to circulate a specific amount of air per hour. So when purchasing an exhaust fan consider the application. Are you venting toxic and possibly flammable fumes? If so purchase a non-explosive fan. What is the cubic feet of the area being ventilated? Once you have this information, confer with a reputable heat and cooling company and select a fan according to their recommendation on how quickly the bad air should be replaced. The manufacturers have specifications on their fans to assist you in selecting the fan that provides the proper airflow for your particular needs. For more information refer to, Ventilation: A Practical Guide by Nancy Clark.
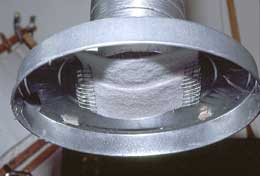
Since wax and paints will collect on the blades of the fan, consider selecting a fan that has a filter that can be remove, cleaned or replaced. In order to filter a vent system such as mine, I purchase fish pond filters that come in sheets. It is the same product used for household furnace intake vent. I cut the filters into several appropriately sized pieces and replace them on my exhaust vent as needed. Be sure to check filters frequently. You may find that you need to clean or replace the filters every few days depending upon how frequently you use wax, paint or other products that build up a residue.
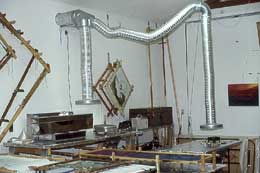
My studio requirements are in a constant condition of flux. I work in a number of different situations, by myself, with an assistant, with a private student or even a class of 8 to10 students. I work with wax, solvents, air brush and I steam set dyes, and on occasion I make a dye bath. To accommodate these situations, Dale and I designed a unique exhaust system. We were inspired by the ventilation system engineered by Monique Beauregard and her late husband, Robert Lamarre, the founders of the Center de Recherché et de Design en Impression Textile de Montreal Canada (Center of Research and Design for Impression Textile).
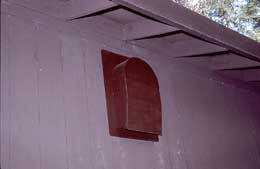
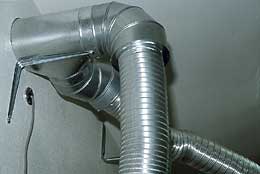
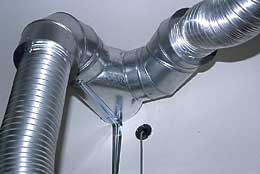
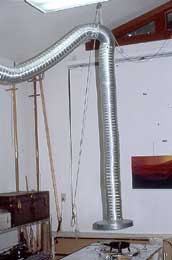
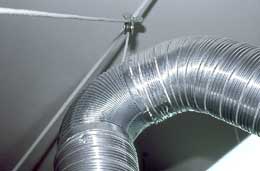
Our system utilizes a high-powered industrial kitchen fan and materials we ordered and purchased through a local hardware store. The fan is mounted on the outside wall of my studio. Inside my studio, the system has two vent hoods connected through flexible ducting to the fan. It also has a crude pulley feature that allows the vents to be repositioned.
Dale installed the fan through the outside wall of my studio extending the inside opening about a foot from the studio wall with galvanized heating duct. After securing the duct from underneath with a 12” shelf bracket, we attached a basic T so we could split the main vent into two vents. We fit each of the two vents with a 90-degree elbow to which we added a long length of expandable galvanized heating duct. At the end of the expandable duct is a hood. The hood was fabricated from the lid of my galvanized trash cans. To attach the expandable duct to the lid, we traced the circumference of the duct onto the center of the lid. We then cut a smaller hole out of the center of the lid leaving a two-inch boarder. To make connecting tabs, the border was then snipped from the center up to the line that designated the circumference of the duct. The tabs were bent up and the flexible duct was slipped over the tabs. The hood and duct were attached to the tabs with self-threading screws. This system creates a high airflow that prevents the combustible fumes from building up in the vent.
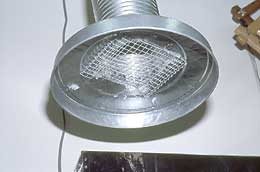
To trap wax and prevent wax and other products that build up in the system we placed a filter over the 6” opening of the hood. To prevent the filter from being sucked up into the exhaust system we completely covered the vent opening with hardware cloth. Hardware cloth is an open wire grid similar to chicken wire. Before attaching the hardware cloth to the hood we bent opposite sides of the hardware cloth down and around into a ‘U’ shape, creating a shelf to hold the filter. Dale used hot glue to attach the shelf to the inside of the hood, covering the vent. When the fan is turned on, the filter is pulled up tightly against the hardware cloth and the vacuum holds the filter in place. The simple shelf has made it easy to replace filters.
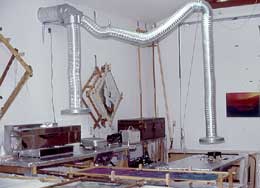
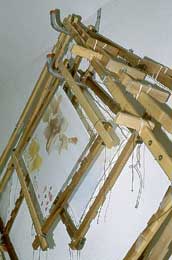
During the renovation of our garage into a studio, iron rods were used to replace the 2 x 6” struts. By replacing the wooden struts with 3/4” iron rods, we created an open vaulted ceiling, which added a more spacious feeling to the workplace. We utilized one of the iron rods to provide ease of repositioning the location of the hood by installing a crude pulley system. The pulley is attached to the flexible heating duct making it possible for the hood and vent to slide along the strut and be repositioned. We used a variable elbow twisted from straight to 90-degrees, to angle the flexible heating duct so that the hood would hang down vertically when the position was changed. The pulley was attached at the point where the flexible heating duct and hood were to hang down. At this point we cut the flexible heating duct into two pieces and reconnected them by inserting each end into the variable elbow.
When I am heating a dye bath or steam setting dye inside my studio, I position one vent over the dye bath or stovetop fabric steamer to vent the steam which can contain irritating fumes emitted from the dye bath or formaldehyde from the newsprint paper the silk is wrapped in. At the same time, the other vent can be used for exhausting my wax application or other processes. I can also position one of the vents over the table when I do the ironing to remove wax from silk. Since the expandable heating duct is flexible, I can raise or lower the hood directly over the wax pan leaving only just enough space for dipping my wax application tool into the pan. The two vents also provide a station for air brush and working with solvents and other potentially toxic chemicals. For added convenience, I can lift and push the vents out of the way when I need the space for other projects.
My studio ventilation system is very effective. I can detect the odor of wax outside but not inside my studio. I no longer get a sore throat, which can work its way into a cold or worse, from working with melted wax. My only problem is, that the exhaust fan removes the heat from my studio along with the gases and fumes. One heat saving solution would be to partition off the ventilation stations from the rest of my studio. A separate room for working with chemicals that need to be ventilated would be a luxury. But, I am still contemplating that and trying to justify the expense. Meanwhile, I wear extra layers of clothing.
Fire Prevention
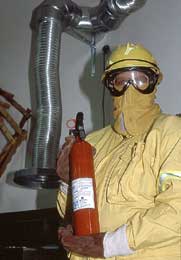
My studio assistant, Judy Bonney wears many hats. In addition to working with me, Judy paints and markets her own designs on silk, works for the United States Post Office and is a firefighter. As a trained firefighter, Judy was a very informative source for a lot of the following information.
Artists working with potentially flammable products such as wax and solvents need to take specific precautions and be aware of how to handle the chemicals and equipment. An artist should work in a space that has at least two exits, one at each end of the room providing access to an exit in the event of fire.
Solvents which start evaporating into the air at extremely low temperature should be kept in a closed container. The fumes can travel and build up anywhere in your studio. If the fumes are accidentally ignited by a spark or pilot light the fire could flash back to the container and cause an explosion.
Hot melted wax and wax fumes created by high temperatures, may ignite as it does when you burn a candle. Hot wax can also form potentially hazardous vapors. Different waxes have different melting points. To prevent fire and exposure to hazardous chemicals and fumes, the wax should be melted only to the lowest temperature at which it remains liquid and will penetrate the fabric. For example the melting point of bees wax is 58 degrees C; 136 degrees F, for some types of paraffin the melting point is 50 degrees C; 120 degrees F and for others it is 60 degrees C; 140 degrees F, microcystalline is 75 degrees C; 167 degrees F.
Electric frying pans and electric woks, which have built in temperature control dials, are relatively safe for melting wax but their manufacturers do not recommend them for this purpose. Crock-pots and electric deep fryer, which are also not recommended for this purpose by their manufacturers, are difficult to use because the pots are deep, consequently you can burn yourself on the sides, making brush handling and wax application even more of a challenge.
When melting wax in a double boiler use an electric heat source not an open flame. Also use a kitchen thermometer to monitor the wax temperature very carefully. If for any reason the wax spills on or near the flame, it can easily cause a fire. If the wax gets too hot, there is also a possibility that the wax may ignite.
Some of my wax application techniques are messy, so to prevent a fire I cover my wax tables with heavy-duty aluminum foil. When the wax builds up on the table becoming hazardous, I either iron the wax build up off the foil by using newspaper to absorb the wax or I simply replace the old foil with new.
To keep a fire from starting or spreading, it is wise to keep all paper and flammable products away from the heat source. The paper I have used to absorb the wax is very flammable. I roll the wax-covered paper into a ball and place it in a paper bag. Once I get a bag full I give it to Dale. He uses the wax coated paper balls to lite the wood-burning stove that heats his studio.
A Flammable Class A B C fire extinguisher is essential equipment for any studio where flammable liquids are used. The extinguisher should be handy and installed near the wax application stations and between you and the exit. Judy recommends this dry chemical type extinguisher because it is very effective as well as inexpensive.
There is more than one way to extinguish a wax fire. Placing the lid back onto the electric pan can smother a fire. A commercially made fire blanket, which is recommended for smothering kitchen grease fires, can be kept handy for this purpose. Heavy cotton cloth, which is marginally flame resistant, can also be effective.
One thing you should not do when attempting to put out a wax fire is use water. Wax will float on water and spreads the flames. If you are around electricity or have an electric heat source, water provides the possibility of electrocution as well as enabling an electrical fire.
IIn my life as an author, batik artist and instructor I have met many people who use wax as a part of their creative process. The good news is that I have only heard about two wax fires.
One started in the basement of a college dormitory. The student, who I knew to be a walking hazard, while using the wax pot, walked away and left the wax pot unattended. The wax over heated and the fumes caught fire. The flames then caught onto the wax-covered newspaper (not recommended) she used to cover the table and the fire spread quickly. Fortunately, the fire was extinguished before it spread into the dormitory but the student was expelled. The lesson learned reflects back to common sense; do not leave your wax pot unattended.
The other incident happened in a kitchen where wax was being melted in a double boiler over an open gas flame. The double boiler ran out of water overheating the wax, creating fumes and the open flame ignited the wax. The fire was controlled. These incidents could have ended as a disaster.
Storing Flammable Products
Judy informed me that for the small amount of flammable products we use as fiber artists, it is not necessary to keep them store in a hazardous materials cabinet. I was pleased to hear this because a hazardous materials cabinet is expensive and difficult to open and closed. For an alternative, Judy recommends storing flammable products on a designated metal shelf. The metal shelf should be located away from a heat source. Clearly label the items so you know the type of flammable products stored there. Flammable products should not be stored in glass or other breakable containers. These products should be stored in metal containers or in the original manufacturers container in which they were purchased.
Oxidizers such as bleach and discharge paste, when mixed with solvents, can combust. To prevent reactions and combustion, don’t store solvents such as alcohols, rubber based gutta, gutta thinner, mineral spirits and naphtha with oxidizers in the same area.
Don’t let this information intimidate you. Others and myself have safely worked with melted wax and other flammable materials for many years. You can protect yourself and prevent an accident if you follow the simple guidelines outlined here along with abiding by your own good common sense. After speaking with Judy I made a few changes in how I store my studio supplies and products.
Solvents and paints that do not mix with water and are considered hazards should not be poured down the drain. Most communities have a place where you can drop off your hazardous materials for proper disposal. To find out the details, contact your local department of environmental protection.
Lighting and Color
In order to see colors accurately, the light source needs to contain all the colors of the rainbow, and in equal amounts. The only naturally occurring source to provide this type of illumination is daylight. Therefore daylight provides us with the best light for seeing and working with color. Most of us are familiar with “full spectrum lighting” the first total spectrum light source that Dr. Ott invented known as the OTT-LITE®. It is one of the closest lights to natural sunlight. He and others have since created products that have revolutionized the lighting industry.
The generic name for this type of lighting is full color lighting. Professionals such as artists, and designers use it where true color rendition is necessary for their work. There are companies that make a variety of full spectrum light bulbs. Some of the companies offer bulbs that emulate the daylight at a specific time of day such as 11 AM, Noon, and 1 PM. The light at different times of day is referred to as a temperature.
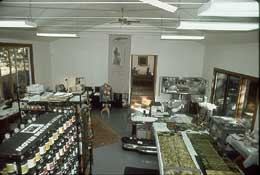
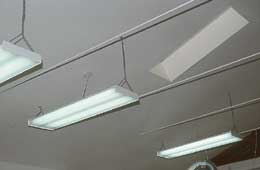
I equipped my studio with full color florescent bulbs that emulate the temperature of 2 pm. I also have frosted skylights that let in natural light. Depending on your specific need, many light fixtures are available to choose from; table lamp, floor lamps and photography lights are just some of the other options.
When applying color to white silk, the working surface should preferably be white. A color other than white may shadow and reflect under the lightweight fabric. The surface color reflected will change the hues on the fabric and ultimately interfere with color choice and color mixing. The same is true for translucent porch, carport roof, or tarp made with colored material that alters the color of the light in the workplace.
Sun shinning through skylights as well as windows can create hot spots on artwork and containers of dye, causing the dye/color to fade. To help avoid fading, choose skylights made with frosted glass so the light becomes diffused as it enters the room.
If you are renovating or building a studio, take the opportunity to make your studio more useful by creating a balance of windows and wall space. Windows are needed for light, fresh air and fabulous views to help you refresh your creative juices. You also need wall space to hang and view your artwork in process and to store equipment, such as the Moyer Design Fabric Stretching System when not in use. Place shelving on south walls so the sunlight is less likely to affect the products. For example, the sun will fade or weaken the color strength of liquid dye and heat up flammable materials.
Basic Studio Worktable
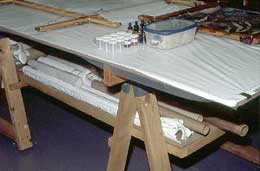
Dale constructed a large versatile worktable. My worktable has the following features. It is 48” by 72” and accommodates most widths and lengths of fabric and supports my stretching system. The table height is 36”, which is a comfortable height for me to work standing. You might prefer customizing your own table so it best suits your own height. Since my studio floor is cement it can be very stressful to stand on it for a long period of time. To help eliminate this problem, I placed several industrial rubber mats (like those used in restaurant kitchens) next to my worktable. I also use an adjustable chair on rollers so I can sit at a variety of heights while working at the table.
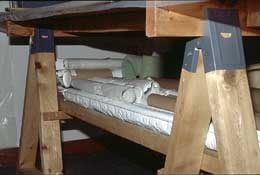
The tabletop is a large piece of pressboard supported by two sawhorses and two 2 x 4s that prevent the pressboard from sagging in the middle. Attached to the inside legs of the sawhorses is a pressboard shelf where I keep designs, rolls of paper patterns, and rolls of fabric. The top of the shelf is 15” below the tabletop. The shelf is only 68” long and 30” wide. The shelf is not as long or wide as the table so that there is room to comfortably sit and work all around the table. The legs of the table are on wheels that can be locked so I can easily reposition the table.
The tabletop is not attached to the supporting sawhorses so it can be removed and flipped from a hard surface to a padded printing table for screen-printing fabric or to a surface equipped with a commercial fabric-cutting grid.
Basic Storage
Artists working on a large piece of fabric need to move around their work thus they may often change their working positions or rearrange the stretched fabric. For convenience, dyes, brushes and other supplies can be kept on a small cart, (available through Rubber Maid) which can be wheeled along with them to keep supplies handy and from cluttering the worktable.
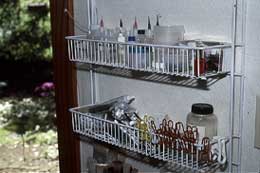
I store supplies on wire door racks such as pantry shelves. They are shallow, easy to install and don’t take up a lot of space. When installed on a studio wall, they are an inexpensive and convenient means to store one or two rows of items allowing, the artist to find what they need quickly. Other than the wire rack and my freestanding bookshelves, all the storage shelves in my studio are on wheels that lock. This provides me with the option rearrange my studio space as needed and keeps things off the floor away from any moisture that may come up through the cement.
For artists who do not have a permanent studio and need to set up their workplace and break it down conveniently and quickly, I suggest keeping your supplies on a cart that can be easily rolled into a designated closet. This will help make the set up and break down process go more quickly. The cart will also be a handy way of keeping you worktable free of supplies. You will have more room to work on your fabric and be less likely to spill liquids. Use a cart with side rails so that your supplies don’t slide off. If this kind of cart is not available to help contain spills, place the liquid containers on trays. Line the cart with rubber drawer and cabinet liner, which can be found in many hardware stores and retail outlets such as Longs Drugs. The liner helps to keep the trays from sliding off when the cart is in motion.
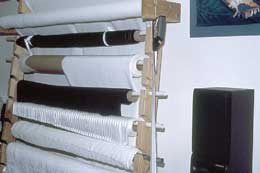
Silk should be stored away from the dye mixing and painting area. You can store it either in a closet or on a rack on the wall. Since silk needs to breathe, resist the temptation to stores silk in plastic for extended periods of time.
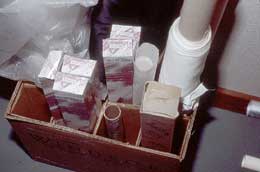
You can purchase commercially made map storage bins from Holdeverything or other sources but I find the cardboard boxes used to ship wine have partitions which provide a handy cheap way to store small rolls of silk, rolled up patterns, rolls of paper and if not in use, shinshi and harite, and the bars from the Moyer Design Fabric Stretching System. Otherwise, to store the stretchers that are set up and stretchers holding work in process stretched, I hang them over ladder hooks that are attached to my inside studio walls.
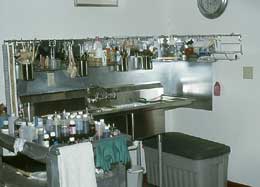
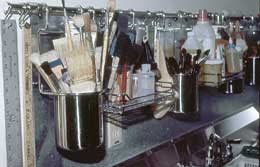
Sink and Storage
I had fun planning and installing my studio sinks. Purchased through a restaurant supply outlet, the double bowl stainless steel sink is a stand-alone unit. The unit includes two sinks in the center with a drain board on the side of each sink, which I use for pouring dye and mix dye powder. The back splash was fabricated from galvanized steel purchased through a local metal shop and heating supply store. For the storage over my sink I was inspired by the kitchen racking system found in the mail order catalog Holdeverything. I liked the stainless steel look to match my double sink. Above the back splash there is a long rod. Hanging from the rod there are various containers to hold brushes and other implements. Also, hanging from the rods are wire racks to store my clean up supplies and hooks to hang my Rozome brushes, funnels and various equipment. Under the sink I store the usual buckets and rubber tubs found in a surface design studio. The designer sink with all of its hanging compartments is much more fun and easier to use than a shelf that would ultimately become a cluttered mess.
Except on rare occasions, I do not dye fabric in a dye bath. Therefore, I did not install a deep bathtub used in many surface design studios for dying and rinsing yardage. If I should ever decide to install a bathtub, I would install the tub outside near the existing pluming and on a platform that would raise the height of the tub. The height would make bending and working over the tub easier on my back.
This information and the images of my studio ventilation system is an expanded version of my presentation for the World Batik Conference and will be available on my web site www.moyerdesign.com.
Obviously I have not covered every aspect of studio safety. Although hopefully I have given you enough information to alert you to the hazards and the resources for you to find the answer to your particular studio safety needs.
I wish you all a creative,productive and healthy life. Thank you for coming.
How to make a mixing box
Cut off the top and one side of a 10”x10” cardboard box. Cut a stack of newspapers the size of the inside dimension and place them inside the box. Dampen the surface of the newspaper with a sponge or spray bottle filled with water. Measure dye or auxiliary powder and dissolve it with water. Once the powder is mixed with water, carefully roll up the top sheet of newspaper and discard. This way any excess powder that falls on the damp newspaper does not blow around.
Bibliography
• Benjamin, Betsy Sterling. The World of Rozome. Tokyo: Kodansha, 1996
• Brito, Karren. Dressing for Dyeing. Surface Design Newsletter.Volume 20. No 1 Winter 2006
• CDS, Centers for Disease Control and Prevention,
Website: www.cdc.gov/ CDS, Centers for Disease Control and Prevention
Centers Institutes and Offices, ATSDR: Agency for Toxic Substances and Disease Registry, 2005
• Dyrenforth, Noel. Houston, Batik. London: Orbis Publishing Limited, 1995
• Holdeverything, Kitchen. Website: http://www.holdeverything.com/, Kitchen-Racking System: William-Sonoma, Inc., 2005
• PRO Chemical & Dye, Inc., Studio Safety & Guidelines.
Website: www.prochemical.com: PPO Chemical & Dye, Inc., 2005••
• Rossol, Monona. The Artist’s Complete Health and Safety Guide. New York: Allworth Press, 2001
Check out our site and product catalog.
Just give us a call at 1.800.790.6377
or email us at:
susanlouise@moyerdesign.com
Home
© Moyer Design, Inc. 2007. All rights reserved.